Building a Cloud-Init Debian Template on Proxmox
Installing a VM from an ISO through the Proxmox console is slow: boot the installer, click through partitioning, wait for package installation, reboot, then configure networking and users by hand. A cloud-init template skips all of that. You import a pre-built cloud image once, turn it into a Proxmox template, and every clone afterwards boots in seconds with networking, users and SSH keys already in place — set entirely through cloud-init on first boot.
Why this is faster than a normal install #
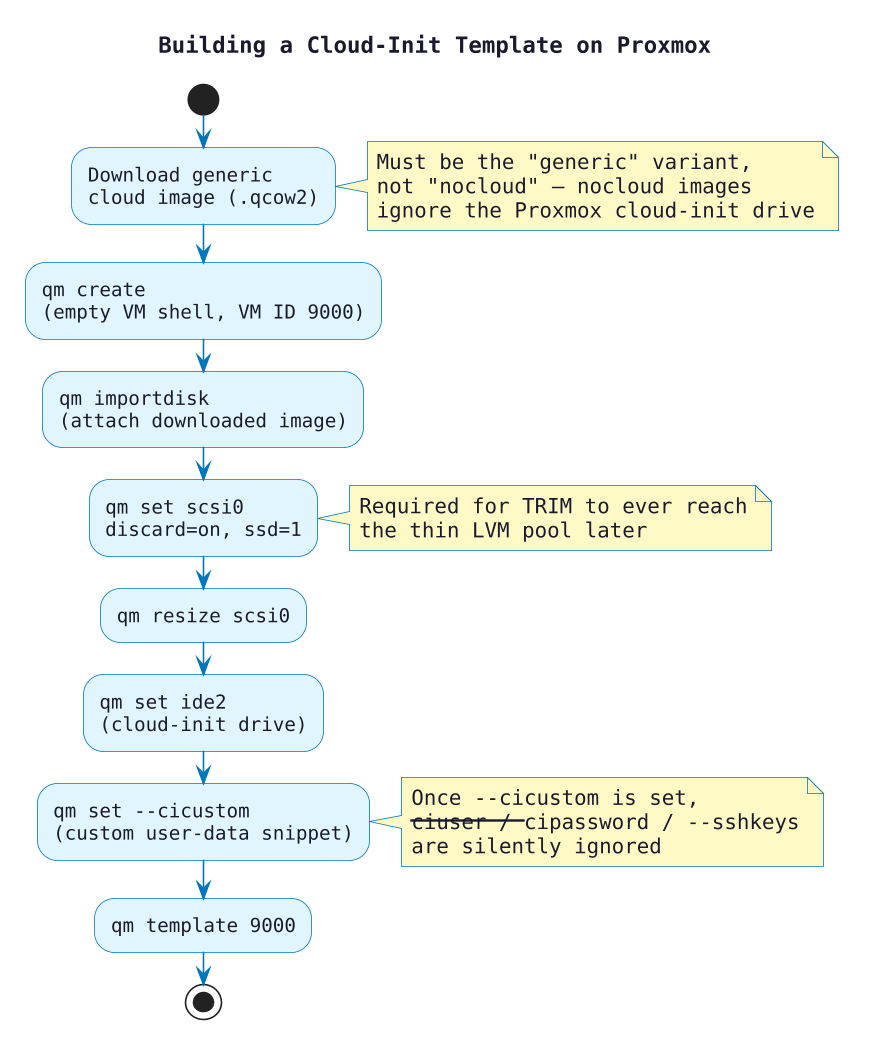
A cloud image ships as a minimal, already-installed root filesystem with cloud-init baked in. Proxmox just needs to import that disk image, attach a small cloud-init drive, and boot it — there’s no installer to run at all. The IP address is picked up automatically over DHCP (in my homelab that’s handled by dnsmasq, which ships as part of OPNsense, itself running as a VM on the same host), so there’s nothing to configure on the network side either.
1. Download the image #
cd /var/lib/vz/images/
wget https://cloud.debian.org/images/cloud/trixie/latest/debian-13-generic-amd64.qcow2
This must be the “generic” variant. Debian (and most other distros) also publish a “nocloud” image — that build has no cloud-init package installed at all, so the cloud-init drive you attach later is simply ignored and the VM boots with no network config, no user and no SSH key.
2. Create the VM shell #
qm create 9000 --name debian-tpl --memory 4096 --cores 8 \
  --net0 virtio,bridge=vmbr0 --scsihw virtio-scsi-pci --ostype l26 --agent 1
Use vmbr0 unless your setup has a reason to use a different bridge — it’s the default bridge Proxmox creates on install.
3. Import and attach the disk #
qm importdisk 9000 debian-13-generic-amd64.qcow2 local-lvm
qm set 9000 --scsi0 local-lvm:vm-9000-disk-0,discard=on,ssd=1
qm resize 9000 scsi0 30G
discard=on,ssd=1 matters beyond this template — see the note on reclaiming space below.
4. Add the cloud-init drive and set boot options #
qm set 9000 --ide2 local-lvm:cloudinit
qm set 9000 --boot c --bootdisk scsi0
qm set 9000 --serial0 socket --vga serial0
The serial console occasionally doesn’t come up cleanly on the very first boot — if the console looks blank or stuck after cloning a VM from this template, a second restart usually clears it.
5. Configure cloud-init #
Proxmox’s built-in cloud-init fields work fine for a quick test:
qm set 9000 --ciuser myuser --sshkeys /var/lib/vz/snippets/myuser.pub \
  --cipassword mypassword --ipconfig0 ip=dhcp
For anything beyond a one-off VM, use a custom snippet instead — it lets you set up multiple users, sudoers, swap and startup commands in one place:
qm set 9000 --cicustom "user=local:snippets/debian-common.yaml"
Important: once --cicustom is set, Proxmox’s own --ciuser, --cipassword and --sshkeys fields are silently ignored — the custom user-data snippet takes over completely. Don’t set both and expect them to merge.
A second gotcha with the same root cause: qm cloudinit dump 9000 user (the command normally used to preview what will actually be applied) only shows the default Proxmox-generated cloud-init config, not the contents of your custom snippet. If you’re using --cicustom, that command is not a reliable way to check what will run — read the snippet file itself instead.
Example snippet (/var/lib/vz/snippets/debian-common.yaml), with all identifying details replaced by placeholders:
#cloud-config
manage_etc_hosts: true

users:
  - name: myuser
    sudo: ALL=(ALL) NOPASSWD:ALL
    groups: sudo
    shell: /bin/bash
    lock_passwd: false
    passwd: '<SHA-512 hash — generate with mkpasswd, see below>'
    ssh_authorized_keys:
      - '<your public key here>'

chpasswd:
  expire: false

swap:
  filename: /swapfile
  size: 10G

runcmd:
  - systemctl enable --now fstrim.timer
systemctl enable --now fstrim.timer matters together with discard=on,ssd=1 from step 3 — trimming inside the guest OS is what actually returns freed blocks to Proxmox’s thin LVM pool. Without both sides in place (guest-side TRIM and discard on the virtual disk), deleted data on the VM never shrinks the space used on the host.
To generate the password hash for the passwd field:
mkpasswd -m sha-512
(mkpasswd is part of the whois package on Debian/Ubuntu if it’s not already installed.)
6. Convert to a template #
qm template 9000
A templated VM can no longer be started directly — it only exists to be cloned.
Cloning and growing the disk #
qm clone 9000 101 --name workstation-example --full
qm start 101
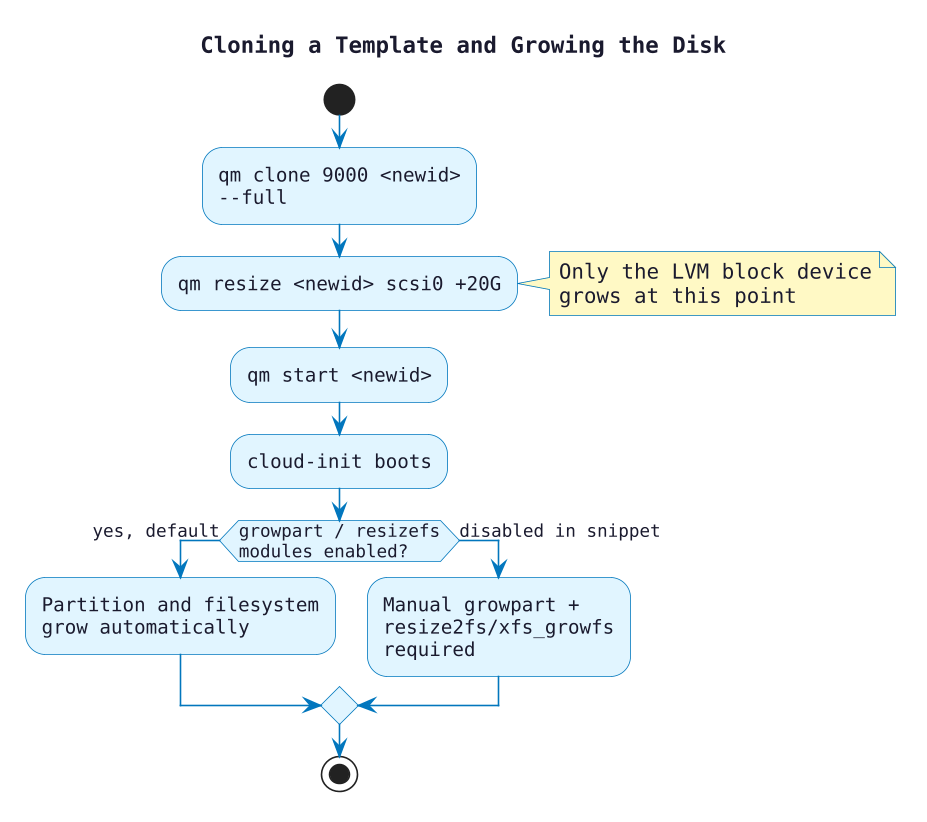
If a clone needs more disk than the template’s 30G, grow it after cloning, before or after the first boot:
qm resize 101 scsi0 +20G
This only grows the underlying LVM block device. As long as the growpart and resizefs cloud-init modules are enabled (they are by default, unless explicitly disabled in a custom snippet), cloud-init grows the partition and filesystem to match automatically on the next boot — no manual growpart/resize2fs needed.
Summary #
- Always use the generic, not nocloud, cloud image variant.
vmbr0as the default bridge, unless your network setup says otherwise.- The serial console can need a second restart after cloning before it displays anything.
--cicustomsilences--ciuser/--cipassword/--sshkeys— pick one approach, not both.qm cloudinit dumpdoes not reflect a custom snippet’s contents.- Reclaiming space on thin LVM needs
discard=on,ssd=1on the disk andfstrim.timerenabled inside the guest. - Disk resize after cloning grows the block device; cloud-init’s
growpart/resizefshandle the rest automatically on next boot.