Martin Koníček
Blog
HyperV backup to AWS S3

Introduction
Recently, I faced challenges with my MicroK8S cluster on a HyperV server (essentially, my desktop). The need for a solid disaster recovery and quick restoration plan became evident. After exploring, I realized the lack of high-quality, user-friendly backup software for Windows. Even options like Ashampoo Backup fell short, especially in S3 backup support.
I then shifted towards a more automated solution that could back up my Kubernetes server on HyperV during runtime, without breaking the bank. The answer lay in backing up the entire virtual machine, particularly using HyperV's machine export feature which works without stopping the machine.
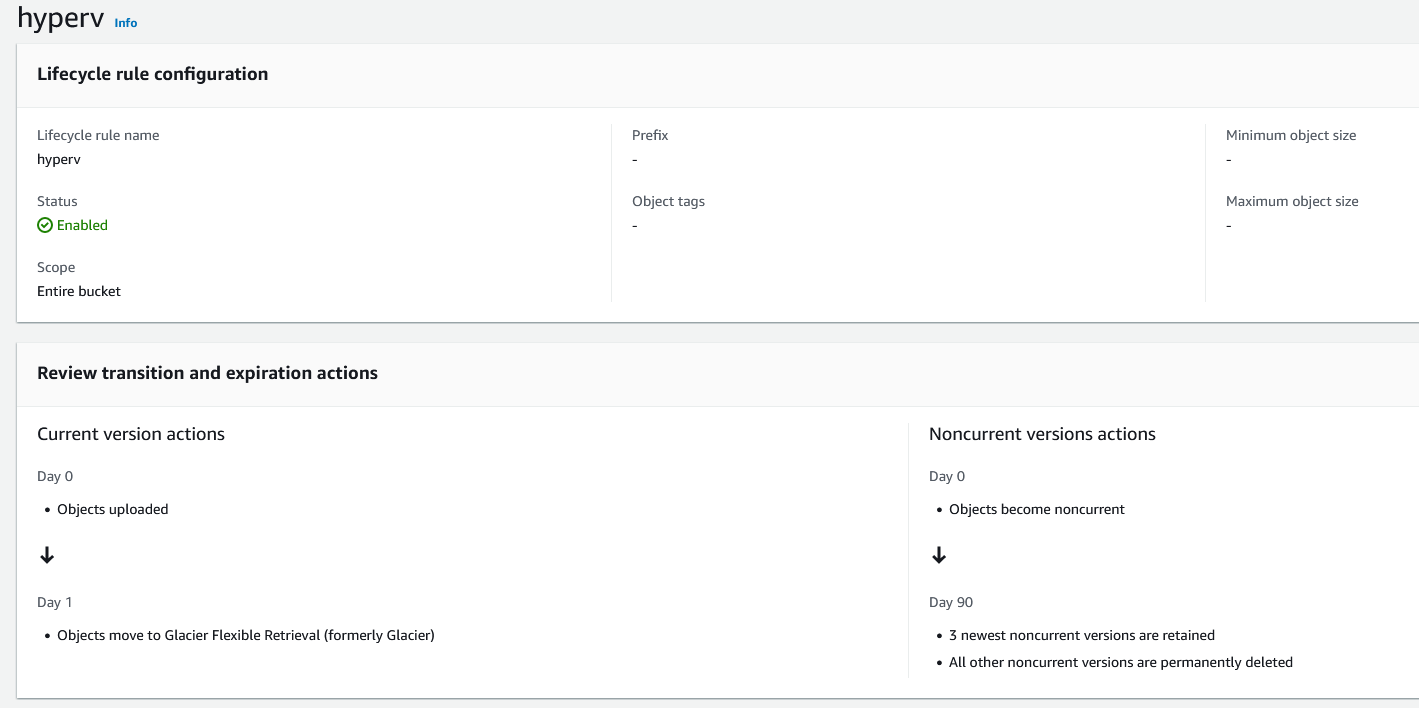
With ChatGPT's assistance, I crafted a PowerShell script that not only exports the VM but also compresses and uploads it to S3 Glacier. This setup retains local backups for 90 days, leveraging AWS lifecycle rules and bucket versioning for the same duration.
While not exactly an enterprise-grade solution, I'm confident in its efficacy for swift disaster recovery.
Technical solution
The technical solution for backing up HyperV utilizes the HyperV export feature, which is particularly advantageous because it allows for backups to be made while the machine is still running. This means there's no need to halt operations for backup processes, ensuring continuous system availability. The entire backup script can be scheduled and automated using Windows Task Scheduler, further simplifying the process.
A key benefit of this solution is the use of WinRAR for compression. WinRAR provides a more efficient compression ratio compared to ZIP, and it includes the capability to add a recovery record, enhancing the reliability of the backups.
Additionally, the backup system integrates with AWS's Simple Notification Service (SNS). This feature sends notifications via email upon the completion of the backup process, regardless of whether it was successful or not. This immediate feedback mechanism ensures that administrators are promptly informed about the status of their backups, allowing for quick responses in case of any issues. This combination of features makes the backup process both efficient and reliable, with minimal disruption to ongoing operations.


AWS Configuration
For my backup solution to function effectively, I had to dive into AWS a bit. Firstly, setting up lifecycle rules in AWS was crucial to ensure older backup versions automatically move to Glacier, keeping costs in check. Then, creating an S3 bucket was the next step, a straightforward task on the AWS platform. To link this with my PowerShell script, installing and configuring the AWS S3 package was essential. I remember browsing through AWS documentation and a few helpful forums (like Stack Overflow) to get this part right. It wasn't a walk in the park, but it was a learning experience that made the whole process more intuitive and user-friendly.
Links to configure AWS on Windows
- https://docs.aws.amazon.com/powershell/latest/userguide/pstools-getting-set-up-windows.html
- https://docs.aws.amazon.com/powershell/latest/userguide/specifying-your-aws-credentials.html
Bucket lifecycle rules

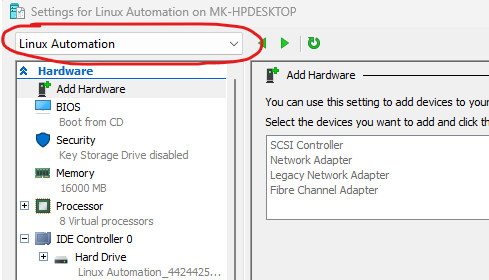
Find the name of your machine in HyperV

Source code
- Make sure you have enough space in export path (there should be 4 times more space than what your compressed HyperV machine takes on drive)
- Create SNS topic with your e-mail to subscribe to status messages
- Install WinRar
- Create bucket in S3 with lifecycle rules
# Add to task scheduler
# Start a program; Powershell.exe -ExecutionPolicy Bypass -File "backupvm.ps1"
# Define variables
$VMName = "VM Name"
$ExportPath = "C:\backups"
$RarFileName = "vm-name"
$RarFileNameWithDate = "$RarFileName-$(Get-Date -Format 'yyyyMMdd-HHmmss')"
$S3Bucket = "hyperv-backup-s3"
$SNSArn = "arn:aws:sns:eu-west-1:xxxx:Backup"
$daysToKeep = 90
$currentDate = Get-Date
$WinRARExe = "C:\Program Files\WinRAR\rar.exe"
$RecoveryRecordSize = "5%"  # Set the desired percentage for the recovery record
https://gist.github.com/koss822/1578d2b060db11f215137e42a5e3235a
